Showing posts with label krafttime. Show all posts

Thursday, 8 October 2020

Flower Cluster Art Journal Page

 Hi Everybody,

Hope all are doing well and keeping sane in these tough times. Today I have a soft and serene looking layout page from my art journal for you. Here it is!


Here is how I went about doing this layout

  • I prepped the base with clear gesso and then did a light wash of watercolors and let it dry.
  • I then took a stampset of flowers and framed the layout with flowers on the borders
  • I stamped a single rose in the center and stamped my focal point sentiment from a Kaisercraft stampset. 
  • I colored in the focal point stamped image using watercolor pencils so that it stands out from the rest of the flowers on the border.
  • Finished the page with a few gem drops.

Do let me know how you like it and how it has turned out. Your comments are what motivates me to keep making these!

Entering these to the below challenges:

  1. Crabbie moments- Anything Goes
  2. SplashyMix Challenge Moodboad: Inspiration is the flowers on the moodboard
  3. Chocolate Baroque - Anything Goes
  4. Butterfly reflections Ink - October Moodboard

Sunday, 13 September 2020

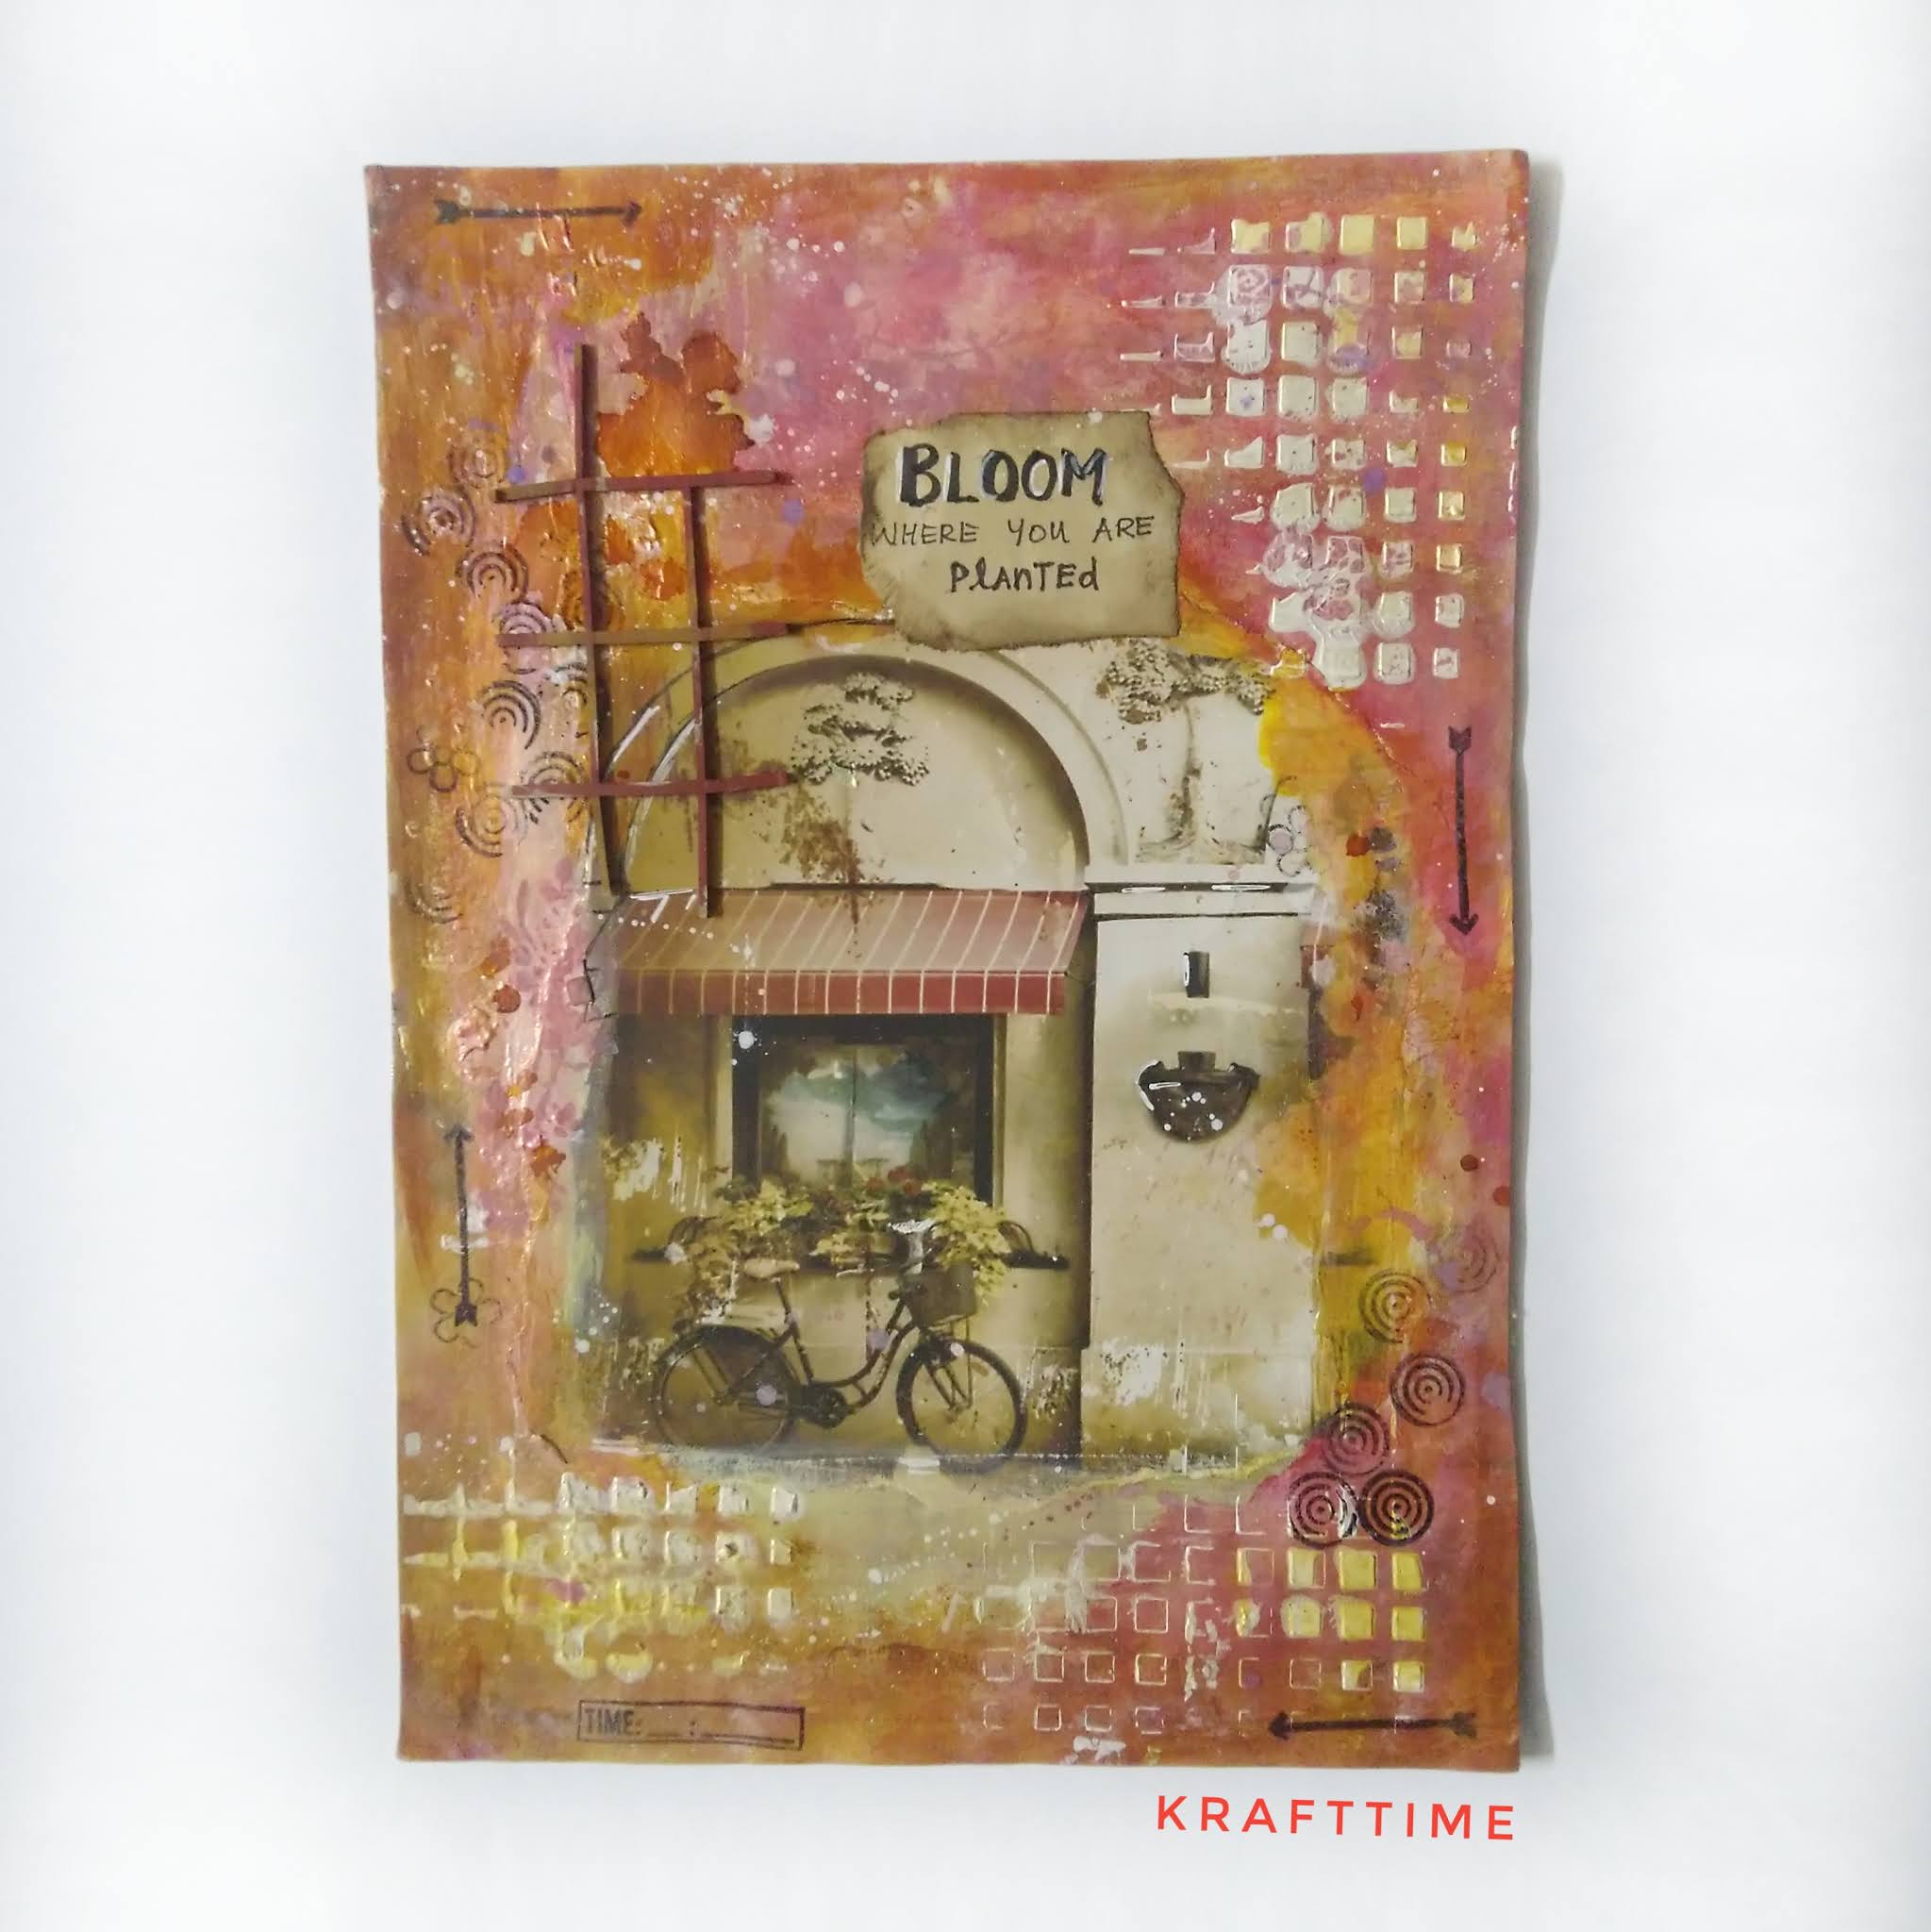
Bloom where you are planted

 Hey there fellow friends,

I have a fun grunge layout page to share with you today. 


Here is how I went about it. I prepped the base with some gesso and added the main focal image which was a part of decoupage paper. I then blended it out with some acrylics, distress oxides and alcohol inks.

I have added some texture paste with some stencils and some stamps along the borders. I added a handwritten note for the sentiment which reads "Bloom where you are planted" on a coffee dyed paper. 


I really love all the shades of red-browns going on here. Such a warm and earthy tone to this page of mine!

Until next time!

Entering this to the below challenges. 

A bit more time to craft - Anything Goes

Love to scrap - Anything Goes

Stamping Sensations - The Great Outdoors (A take on outdoor spot )

Sunday, 6 September 2020

Quick Art Journal Layout - Cactus!

 Hello everyone!

I am so happy coz it is my 200th post today! Had there not been a couple of years gap in this blog, this milestone would have happened long back! But still, time to move now and keep sharing the work consistently in this space!

Today I have for you all an easy art journal layout page. Here it is first!


You can create this with any small stamps that you have and make that into a focal point. To take the fear of backgrounds away, I have a easy fix. Whenever you are apprehensive of doing backgrounds for a journal, try this technique.

  1. Take few pieces of cardstock or pattern paper in the shade you want your background. 
  2. Stick them randomly one on top of the other varying the spacing and orientation. This will give you a look of lot of tiles piled on top of each other
  3. Give a coat of white or clear gesso. 
  4. Pick your main colors. Today I have picked lime green and yellow. You can use any medium you want here. I have used watercolors, distress crayons and markers. 
  5. Keep the tile portions lighter and add shadows to the edges using black or brown so that it adds a lot of the depth to the layout. 
  6. Pick out any small stamp and repeat the design on few tiles and color them accordingly. I have used Itsy Bitsy Cactus stamphere. Arent they just cute?
  7. Add a sentiment or label that goes with your journal page theme
  8. Tada! your quick page is ready! I love to add white splashes and highlights, but that is totally optional. Also if your journal pages seem sticky on closing them use a bit of wax on your finished layouts :) 

Wasn't it easy? 

Entering this journal page to the following challenges

Sunday, 23 August 2020

Krishna Journal Page

 Hello there people!

Finally i am writing back on my blog after more than 2.5 years. My last post on blog was on Nov 2017! Whaaaaaaaaaaat ????? 

Even though I was very active on my Instagram profile and could not manage both, I always missed the long detail rants that I can have on my blog that I was unable to express on Instagram. 

During this lockdown I have started doing journal pages to start using up my supplies. There are so many artists who have super beautiful and complex journal page layouts, but my style always depends on the mood on the day that I am working. Some days it is grunge, some time it is fun and quirky and sometime it is a take on India, Hinduism, and deities, murals and related stuff. 


This page is a take on cute achukuttan or Krishna, Whenever i feel not in a great mood to craft or sketch, the best thing for me to do is sketch him out. Because however you sketch or whatever mistakes you make, he will always turn out beautiful and charm you and your day!


I prepped the base ( just couple of copy papers folded in 2 and glued together) with gesso and applied acrylic paints with a baby wipe. I did a few stenciling of brick patterns but I really did not like that look and blended over it with distress inks to try and mute it. 

I then free handed Krishna and painted him in yellow and blue. I was thinking what to do with the peacock feather. I did not have one and wasnot sure if would get it right by painting. That is when my eyes fell upon Mudra's chipzeb in paisley pattern which was waiting to be used on my desk. I grabbed a couple and embossed it with Wow Iridium Glitter and added it as his head gear. I love how this turned out!

I love adding sentiments on the my journal pages. So added Om Namo Narayana using a while gel pen on a black cardstock and added it. 

I felt it still lacked some border, so I reached out to the Peek-a-boo designs paisley stamps and picked the small shell stamp. I have had this stampset for a couple of years but never used this particular stamp. How was it so meant to be that Krishna's layout had to have a conch shell border!! Divine intervention or not, it was made for this project. 


Let me know what you think about this project. And hopefully i am more active and blogging again!

Linking this up to the below challenges. 

Mudra Craft Challenge #34:

Products used:

  • Mudra Chipzeb - Paisley
  • Peek-a-boo designs Motifs stampset
  • Fevicryl Hobby Colors for the background
  • Distress Inks
  • Ranger Archival Black Ink
  • Gelly Roll No 10 - White Pen


Wednesday, 1 November 2017

Cristmas Cards - Day 3 Organza Cards

Hello there friends!
Welcome to yet another post on Christmas Cards. Today I have a fun technique to share with you to bring in subtle shine to the cards and give a wonderful texture to it at the same time.


No Glitter, no texture paste, no shimmer sprays here, but the trick is to use some Organza ribbon with shimmery colors and variety in a width that can cover the entire card.
I am not sure where you get Organza strips that are about the size of a 4x6 card here, but I had got some from my brother on his travel to UK.

The cards as such are very simple. I stamped the tree from Craftyscrappers onto different card panels and blended some bright colors using both Distress as well as pigment inks. Then I placed the organza piece on top and taped the edges neatly behind the card panel.
Then I added it onto a top folding 4x6 card on matching shaded and stamped the insides with a simple Christmas sentiment from the same set.


Do let me know how you like this look guys! The subtle shine on the cards is very different from what you get using heat embossing or glitter or shimmer sprays.

Linking this to the following challenges.

MHK Designs - Anthing Goes
Love to scrap - Anything Goes
Bit more time to craft - Anything goes
Inspiration Destination
Crafting By Designs

Thursday, 26 October 2017

Christmas Cards Day 2 - Color me trees from SSS!

Hey, fellas, It is day 2 of my Christmas Cheer card making this year and I plan to do as many as possible and share it with you guys until Christmas.


Today I have a card which is not the usual dimensions of an A2, but I went for a smaller squarish card.


I stamped the tree images using some embossing ink and heat set it with White embossing powder.
Then I blended in some cheerful colors on to the trees and fuzzy cut them. I was not very careful about the fuzzy cutting and kept in playful!

For the sentiment, I used the sentiment from the same SS COlor me Trees stamp set and added it as a banner on the top of the card.

Since the card is a simple and nondistracting one with mild color pop, I wanted to envelop to be bright and screen Christmas! What better than a Red polka dot envelope!
I used the WRM Envelope punch board to create the envelope.

Hope you liked the card fellas!!!

Linking it to the following challenges.
Crafting From Heart : Challenge 180
Crafting by Designs: October Christmas
A Snowflake Promise #45
The Holly and Ivy Christmas Challenge
Crafty Hazelnut's Christmas Challenge Extra
Christmas Challenge #24

Wednesday, 25 October 2017

Spotlight stamping - Inspiration for Christmas

Hi Friends,
I recently saw the video posted by amazing Jennifer on her channel describing the spotlight stamping technique and gave it a try.
Although my take is not as elaborate as hers and uses a single outline stamp with minimal colors, I loved the effect and the fact that it was really so easy to do after hearing her explain!
Here are the cards.
A bit early for Christmas, but hey, better late than never!


To see the original blog with Details from Jenifer, jump here

Linking this to the following challenges:
Crafting From Heart : Challenge 180
Crafting by Designs: October Christmas
Stamplorations: Spotlight project showcase. I was also inspired by the following showcase project by Maria
A Snowflake Promise #45
The Holly and Ivy Christmas Challenge
Crafty Hazelnut's Christmas Challenge Extra
Christmas Challenge #24

Wednesday, 20 September 2017

Stencilled jewelry -A First Take


Hello there fellas!!!
Hope you are doing good. I am slowing getting back to crafting for some time everyday and taking time out to calm my nerves by crafting a bit. 

The festival seasons are upon us at India and this is the right time to start making some jewellery!!!! 

I got out all of my bead boxes and wanted to try something different. 
I had these stancils out on my desk left from some paper crafts and scrapbooking and I felt why not use those designs to get some pendants done..

So here are a couple of examples on how you can use stencils and create really beautiful jewellery out of it.

The first one is a damask kind of pattern that is stencilled and converted to a pendant and linked to some very earthy tone stone beads.


The next one is one of my favourites. It has a simple small repeating pattern that I stencilled in and added some lovely violety beads along with shell pearls.


Do let me know what you feel about this guy's and leave me your comments on the same.

Linking this to the

Wednesday, 6 September 2017

Happy Teachers Day - A Day Late...

Hello there fellas,
I promised I would come back with a set of Teachers' day cards for you.
So here they are!


The supplies are from different Manufacturers, but mostly from two dear Indian manufacturers Craftyscrappers and Mudra. Konica and Varshita and two wonderful souls and I wish them all success at their entrepreneur life.

Let me know what you think of this fellas!
Linking this to the following:
The card concept: withered florals. I have incorporated flowers with distressed and withered feel to it.


Linking this to the Path of Positivity Challenge #51: Teachers deserve a lot of love and this is an attempt to surround them with art and love!!!


Tuesday, 5 September 2017

Decoupage Alters - Peacock in a starry night

Hello friends!
Hope you are having a great day! It is Teacher's day today and I wish all the teachers out there a very happy teachers' day.

I still wish I can go back to school or college and life the simple life with only studies to worry about! Sigh! Gone are those days!!

Coming back here!, today I ought to be sharing some cards for my teachers (which I will post soon) but I am sharing a decoupage upcycle project that I recently did.

I had this amazing papers from Bob and Betty and the designs were just exquisite that I refused using them up for a long time. But then the perfect opportunity came along and I found the perfect object to alter. It was a glass bottle with a  flip stopper cap. Here is how it looks altered from a plain glass bottle version...


Steps to achieve this effect:

  • Sand your bottle down with fine grit sand paper so that the Gesso/primer adheres better.
  • Apply several coats of white acrylic paint/spray paint/gesso to give a base coat. I had good coverage with Gesso. 
  • Next, apply the design you want with a Decoupage Glue. Here I have used ModPodge to adhere the peacock design onto the bottle. 
  • Once adhered, make sure there are no air bubbles between the paper and object and give a couple of coats of ModPodge on top of the paper. 
  • Paint the rest of the bottle with desired colors. I have gone for a night sky effect with blues and black hues with a starry effect. 
  • For added interest, you can add some stamping as well. I have used kaiser-craft script stamp to give a slightly vintage effect.


Let me know what you feel fellas!

Linking this to the


Monday, 7 August 2017

More than words - A Keepsake Pregnancy Journal

Hey there fellas!
I know it has been a crazy long time since I wrote a post! Let me try to be more regular from here on :)

One of the most satisfying things for me is to craft and give away the result to friend or colleague. Just to see the happiness and feel work appreciated is an awesome feeling.

My two best friends are entering the world of motherhood and this gave me an opportunity to make something special for them.
Here is what I made for one of my friends Vyshali.

This one is a tab bit more special as I had the help of her husband who is a really good friend of mine by getting the pictures selected and printing them out and sending them over so that I could use them right away.

Here are the pics for you!


The stamps are mostly from Craftyscrappers, they have an amazing collection in the Pregnancy and Baby theme. The others are from Jane's doodles, Peekaboo, and some various other manufacturers.
I will try to update with links to products in this post sometime later :)
Hope you enjoyed the album! Let me know what you think of it in the comments :)

Linking it to the below challenges:
Create and Inspire #64: Anything goes
Crafts Galore Encore Blog:
A bit more time to craft

Till next time then :)

Featured post

More than words - A Keepsake Pregnancy Journal

Hey there fellas! I know it has been a crazy long time since I wrote a post! Let me try to be more regular from here on :) One of the mo...