Friday, 5 May 2017

Decorative Box - Stamping on wood

Hi all,
I am here with a new technique that I have been meaning to try out for quite some time now. I had some plain MDF boxes and trinkets lying around and I am just getting my hand on trying decoupage and other techniques on them.  Here is a quite white vintage feel trinket box that is suitable for gifts to the masculine gender too!.

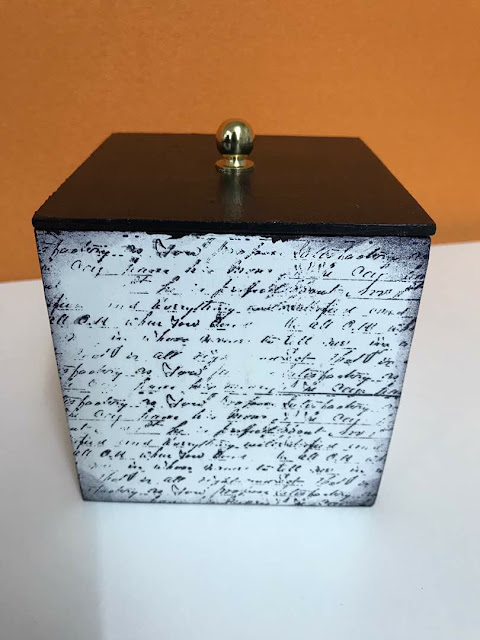
I applied a base coat of gesso and then a couple of layers of white chalk paint from Itsy bitsy. For the lid I have used Back chalk paint.
This project was done for a friend of mine who wanted it ina  black and white combination. I did not want to add flowers or embellishments lest it too too feminine. I wanted to keep it simple for him yet attract attention.

So i used a couple of script fonts that I had with me from Kaisercraft and Itsy bitsy and some mixed media element stamp like the hexagon print. I distressed the edges using Ranger archival ink.

To preserve the piece I appied generous coats of Asian Paints Aquadur varnish.

let me know how you feel about this fellas!

Thursday, 27 April 2017

Cereal Box Upcycle - Paper Holder

Hey guys, Hope you enjoyed my decoupage Organizer caddy post here. Today I am sharing a quick DIY that you can do with all those cereal boxes that you go through (maybe) every month and convert them into a multi functional organizer.


I cut up two cereal boxes into shapes of magazine holders so that they stack up nicely and covered them in pattern papers. Boxes fit the 6 X 6 pattern pads nicely and some other precut cardstock that I have goes in as well.

Now that is one pile of paper clutter sorted out!

Let me know what you think of it guys .

Tuesday, 25 April 2017

Decoupage Organiser Caddy

Hey fellas!!!
I am posting after a really long time. I have been too held up with work and home stuff that I couldn't get some me crafting time. But hope to rectify this soon enough!

Today I have a decoupage organizer for you. Here are the pics first.


Th caddy is from Craftslane and they have some wonderful products. I painted the base with gesso and applied some beautiful tissue napkins on it. I have distressed the edges and napkin by going over with matching colors and painting the insides with acrylics.

Finally, I have given a couple fo coats of varnish to protect it from water.

Let me know how you like it in the commets!

Saturday, 4 March 2017

Mudra First Birthday Blog Hop


Hello and welcome to our “First Birthday Blog Hop”! 
Yes, Mudra is one year old this month and what an amazing journey it has been so far. And this month, we want to celebrate our big milestone with you because it wouldn’t have been possible without your support. We have so many fun things lined up throughout the month with lots of chances for you to participate and win some cool prizes.
We wanted to start the celebration today by bringing together our amazing creative team and few of our friends to share some of their beautiful creations with Mudra products.
We have an amazing line-up of projects that you sure are going to love!


I have personally loved Mudra from the inception of Varnas's creation banner and it has been a amazing journey for the Mudra team.


RULES:  z
- Follow Mudra Blog
- Like Mudra Facebook Page
- Follow us on Instagram 
- Subscribe to your Youtube
- Visit all the designer's blog hop post and leave them some love.
- After finishing the blog hop, add your name in the inlinkz in Mudra Blog Hop Post.

PRIZES:
To celebrate, Mudra is giving away a beautiful pack of crafting supplies from Mudra to 1 WINNER, selected from the comments across all of the blogs in the hop.  You have until Wednesday, March 15th at 11:59 PM IST to enter, and the winners will be announced here on Monday, March 20th.
One Additional Goodie Bag to a random participant sponsored by The Craft Shop, Chennai. 


And to sweeten the deal, some of our designers in the hop also have giveaways, so make sure to leave comments on all the blogs for a chance to win!

    If you have come from Ruchi Crafeteria,  you are on the right track. You can check out the complete list of participating blogs on the Mudra Blog. 

     So let us get onto some fun cards using Mudra products, shall we!!


I have three cards to share for you all today!, all the celebrate something!
Here are they first :)


 First card: Starry nights :)

        For this card, I wanted a distressed night sky background and created this effect with various Distress inks and some archival inks. For the stars, i splattered on gesso. 
The lotuses were stamped and colored using Lotus Blooms set and akashiya watercolor brush pens. 

The sentiment is from the peacock set and encourages you to celebrate the beauty in you and personify it. 

Second card: Celebrating Love
This is a simple water wash background in soft pastely shades and some focal point background using some darker shades. I stamped the LOVE word using the super cool alpha set from Mudra and adhered the panel to some black card base and made some fun border pattern.

Third card:  Celebrate

This card is very generic and can be very quickly customized to create specific occasions. 
I stamped the Celebrate sentiment from the brushed sentiments set and the floral border using the On the special Dat' stamp set with some basic coloring. Here too i wanted a fun colorful background look and did a water wash effect. 

Here are the stamps that i have used from Mudra :)


Hope you enjoyed the post for the day.


Your next stop in the hop is the wonderful Rajni Chawla 


Have a fun hop fellow friends :)

Lots of love 
Uma


Friday, 27 January 2017

Altered Diary :)

Hello, there fellow bloggers!
I have a very different project today to share with you that is not my usual style of jewelry or cardmaking. I had a request from my sister to revamp one of the year diaries that was looking too bland. So here is how it is transformed into!


For the base, I applied texture paste to the front and spine of the diary and let to dry. Meantime I took a pattern paper and tore off the edges and distressed it using brown chalk inks and adhered it to the centre. The rest of the white space was stenciled with MFT stencils and same chalk inks.

For the corners, I have used two doilies distressed with picked raspberry DIs and added two cute doggies from CraftyScrappers stamp set that was sent over oh so sweetly by Konica!.
For the focal panel I die cut a frame and embossed the word DOLLY using Hero Arts Platinum Embossing powder followed by Ranger UTTE.

The spine was then painted in brown acrylics and the back of the diary was kept simple with a vintage pattern paper.

So how do you guys like this!!

Supplies:
1. Ranger UTTE
2. Lawn Fawn Stinkin' Cute stampset
3. Craftyscrappers Kiss your doggie stampset
4. Pattern Paper
5. Distress Inks
6. Chalk Inks
7. Camlin Texture white
8. Doilies
9. Hero Arts Platinum Embossing powder


Entering it to the following

Mudra's Heat Embossing


Craftyscrappers: Try something new : Altered diary

Tuesday, 24 January 2017

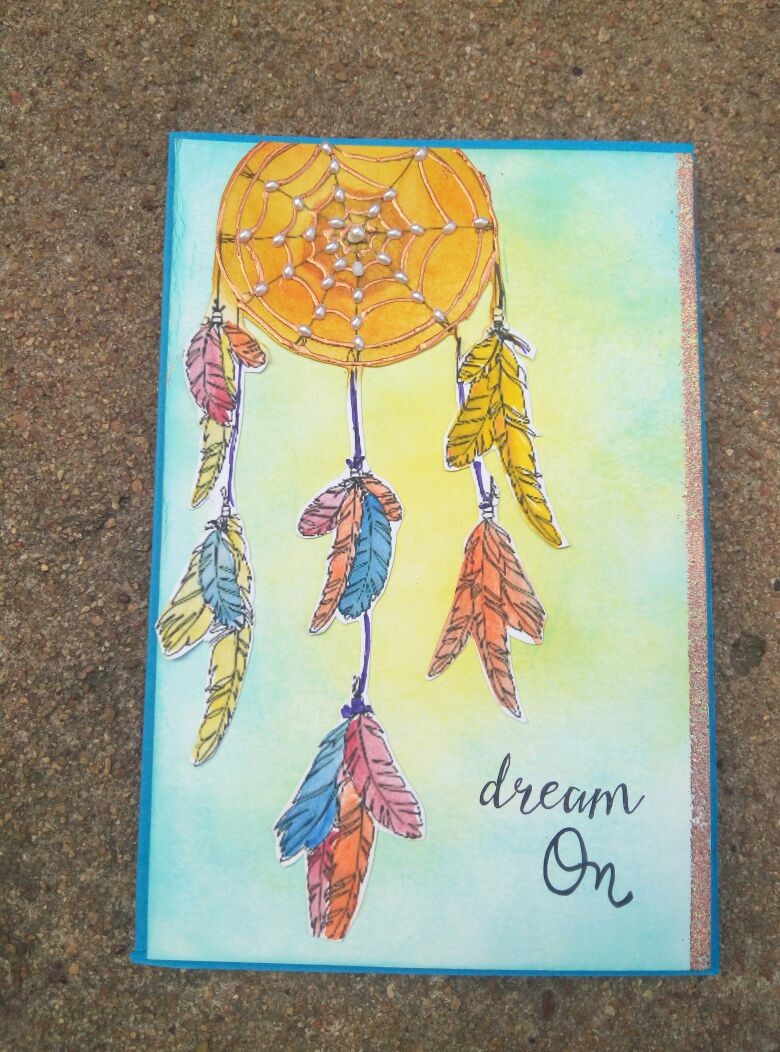
Dream On!


Hi all!
Hope you are doing great!
I am here with my second Guest designer post for the Path Of Positivity Challenge: The road ahead!

Here is my card for you :)


This card features the thought process that while it is absolutely necessary to dream on and keep targets in mind for the road ahead to be clear and definitive, it is equally important to chase all the negativity, obstacles and 'abd' dreams out of our way.

A dreamcatcher is a mystical object that is said to ward off bad dreams! In this card, I have incorporated an image from Ike's Art studio :) Love the beautiful dreamcatcher!!!
I printed it onto some cardstock and fuzzy cut it. I colored them using watercolors and traced out the threaded region using 3D liners and added some tiny half pearls.
I adhered the image onto a panel distressed with peacock feathers and spiced marmalade DIs. For the edge, I masked off a strip and embossed using WOW Iridium Embossing glitter . It adds such a lovely sheen in real life.

Finally mounted the panel onto a Blue Cardstock

The sponsors are Ike's Art , you can check out their awesome designs here.

and also Scribbles Designs, you can check out their awesome designs here.


For more inspirations and designs visit these blogs.
Hope you liked the card and do visit the challenge post and play along. 
Let me know how you liked this fellas!

Thursday, 19 January 2017

Give some thanks!


Hello pals!
Hope you are doing great and that the new year is treating you well!

I have a cheerful thank you card to share with you today. I was so happy to order in  a sweet haul from Simon Says Stamps and get it brought over from the US from a dear friend. THe bunch has a mix of Lawn fawn stamps, SS dies, Embossing powders. Here is all put to use!!!


Close up of the foxy!!


For this card I stencils some bright pigment inks onto a MFT mixables Paisley pattern. Then stampd, colored and fuzzy cut a fox from Lawn fawn's stampset.

I cut out various layers of Thanks in black CS and adhered them together. Finally gave a coat of Ultra think embossing powder.

To finish the card, adhered it onto a ink blue mettalic CS.

Supplies used:

  • MFT Mixables Paisley
  • Lawn Fawn Stinkin cute Stamps
  • Simon Says Stamps - Painted thanks dies
  • Ranger: Ultra Think Embossing Powder CLear
  • Ink Blue Color metallic CS

Linking to some of my favourite challenges!


Let me know your conents fellas!!!

Featured post

More than words - A Keepsake Pregnancy Journal

Hey there fellas! I know it has been a crazy long time since I wrote a post! Let me try to be more regular from here on :) One of the mo...